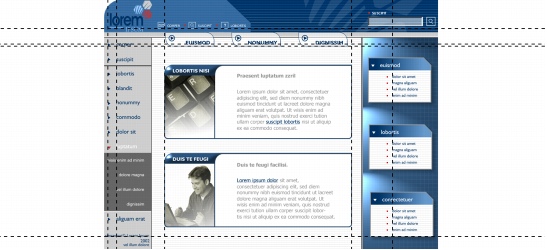
Setting up guidelines
Guidelines are lines that can be placed anywhere in the drawing window to aid in object placement. In some applications, guidelines are known as guides.
There are three types of guidelines: horizontal, vertical, and slanted. By default, the application displays guidelines that you can add to the drawing window, but you can hide them at any time. You can also use objects as guides.
You can set guidelines for individual pages or you can set guidelines for the entire document. For more information about local and master guidelines, see “Local layers and master layers.”
You can add a guideline wherever you need one; however, you can also choose to add preset guidelines. There are two types of preset guidelines: Corel presets and user-defined presets. Examples of Corel presets include guidelines that appear at 1-inch margins and guidelines that appear at newsletter column borders. User-defined presets are guidelines whose location you specify. For example, you can add preset guidelines that display margins at a distance you specify or that define a column layout or grid. After you add a guideline, you can select it, move it, rotate it, lock it in place, or delete it.
You can have objects snap to the guidelines, so that when an object is moved near a guideline, it can only be centered on the guideline or lined up on either side of the guideline.
Guidelines use the unit of measure specified for rulers. For information about ruler settings, see “To customize ruler settings.”

Guidelines can be placed in the drawing window to aid in object placement.
To display or hide the guidelines |
|
A check mark beside the Guidelines command indicates that the guidelines are displayed.
|
To add a horizontal or vertical guideline |
|
3.
|
|
Specify the guideline settings you want.
|
![]()
|
•
|
|
You can also add a guideline by dragging from the horizontal or vertical ruler in the drawing window.
|
To add a slanted guideline |
|
•
|
2 points — lets you specify two points to be joined to create a guideline
|
|
•
|
Angle and 1 point — lets you specify one point and an angle. The guideline crosses through the point at the angle specified.
|
![]()
|
•
|
|
You can also add a slanted guideline by dragging from the horizontal or vertical ruler in the drawing window, and typing a value in the Angle of rotation box on the property bar.
|
To use an object as a guide |
To set guidelines for the entire document |
![]()
|
•
|
|
The guidelines that you set on the Guides layer of the Master page appear on all pages of the document. These guidelines appear in addition to any guidelines that you set for individual pages.
|
To add preset guidelines |
|
If you enable the User defined presets option, specify values in the Margins, Columns, or Grid areas.
|
To modify guidelines |
![]()
|
•
|
|
You can also lock or unlock a guideline by right-clicking the guideline and then clicking Lock object or Unlock object.
|
|
•
|
|
You can access the guidelines setup directly by right-clicking a ruler and then clicking Guidelines setup.
|
To have objects snap to the guidelines |
|
To snap the center of an object to a guideline, select the object, and move it over the guideline until its center of rotation snaps to the guideline.
|